


Tag: Cloudflare
A Cloudflare Argo Tunnel establishes outbound connections from Cloudflare data centers to the Liquid Web infrastructure. Data can safely pass across these encrypted tunnels from the origin server to Cloudflare's edge nodes, enhancing the application's security and speed while shielding the infrastructure from direct internet exposure.
Integrating Cloudflare Access with a Bitwarden instance
In this article we will examine how to integrate a Bitwarden instance with the Cloudflare Access product from Cloudflare, Inc. Adding an additional degree of security and control is typically required for this integration to communicate with the Bitwarden service for password management.
One of the most common questions a Solution Architect receives that has only increased over the years is, what is Zero Trust security? This article sets out to answer this and another critical question, why is Zero Trust important in today's interconnected world?
How To Setup A Domain In Cloudflare
Full Cloudflare Website Integration
In this article, we will discuss how to set up our domain in a full Cloudflare configuration. This will allow us to take full advantage of their many DNS features, increased speed, Railgun options, and other amazing features that full domain integration allows.
How to Use Let’s Encrypt with Cloudflare
Managed WordPress – Frequently Asked Questions
We have collected some of the most common questions that customers ask about our Managed WordPress Hosting platform and housed them in one place.
Optimizing Your Website in Cloud Sites

Exploring the CloudFlare Dashboard
II. How to Configure Your DNS for CloudFlare
III. How To Configure Your Server to Log Real Visitor IPs
IV. Exploring the CloudFlare Dashboard
How to Configure Your DNS for CloudFlare
II. How to Configure Your DNS for CloudFlare
III. How To Configure Your Server to Log Real Visitor IPs
IV. Exploring the CloudFlare Dashboard
Pre-Flight Check
- This article assumes that you have already set up CloudFlare and added your domain.
- We’ll be adding DNS records in Liquid Web’s Manage dashboard. If your site isn’t using Liquid Web’s nameservers, you’ll need to make changes at your registrar or DNS provider.
- We’ll be using cPanel to set up an .htaccess redirect. If you don’t have access to cPanel, you will need to edit your .htaccess file directly; if you’re using a web server other than Apache (such as Nginx or IIS), you’ll need to set up the redirect manually. You can find tips for doing so in the bonus content section of this article.
Step #1: Get Your CloudFlare DNS Settings
- Once your site has been added to CloudFlare via Manage, select Domains from the left menu, click on the CloudFlare tab and click the [+] button next to your domain name to expand the CloudFlare dashboard.
- Now click on the DNS Settings link near the bottom-right corner to view your settings.

- The popup window will show you the specific changes you’ll need to make for your site:
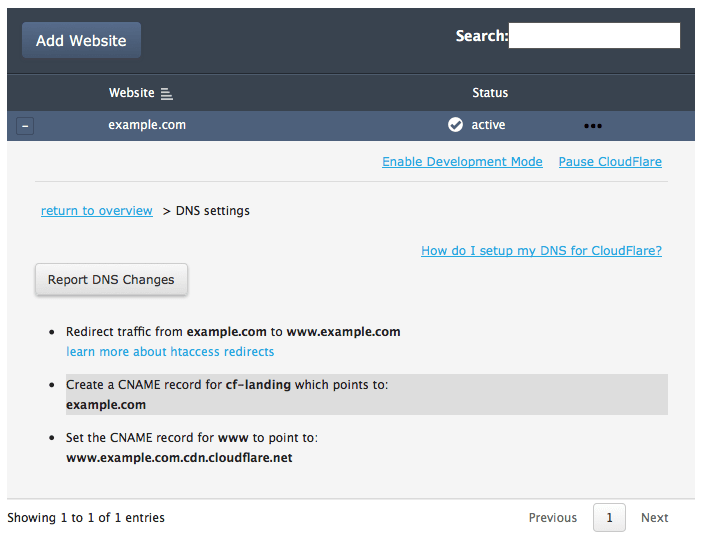 Specifically, you’ll need to:
- Add an .htaccess redirect to ensure all traffic to your site uses the “www” subdomain.
- Add a CNAME record for the subdomain “cf-landing.yourdomainname.com”.
- Change your CNAME record for the “www” subdomain to point to “www.yourdomain.com.cdn.cloudflare.net”.
Step #2: Redirect Traffic to Your ‘www’ Subdomain
If you have access to cPanel, setting up the redirect is a simple process using the method detailed below. If you don’t have access to cPanel, though, you’ll need to set up the redirect manually. You can find tips for doing so in the bonus content section of this article.
How To Configure Your Server to Log Real Visitor IPs
Because CloudFlare acts as a proxy, all visits to your website and web applications will, by default, be logged as originating from a CloudFlare IP address — not the visitor’s actual IP address. However, the Apache module mod_cloudflare can be used to ensure that visitors’ actual IP addresses are logged and displayed. We recommend that you activate mod_cloudflare as outlined in this article to accurately log website visitor IP addresses and prevent unwanted behavior. Without this step, your server’s firewall could block CloudFlare’s IP addresses, making your site inaccessible. If you need to check whether the module is already enabled or need assistance installing it, please open a ticket and Heroic Support® will be happy to help.
Our Sales and Support teams are available 24 hours by phone or e-mail to assist.